PayPal is a secured online service for performing financial transactions. To cope with this digital era, having a secured online service for running your financial activities is a must which is why you intend to create one for yourself. Of course, PayPal is a popular service but its unavailability in Ghana makes it unpopular, at least in the Ghanaian context. Nevertheless, people find it valuable and keep finding ways to use the service despite the restrictions. If you’re one of them, this guide is what you’ve been looking for and I’m glad you found it. Let’s go!
Can I use PayPal from Ghana?
Ghana is currently among the blacklisted countries by PayPal which explains why using the service in Ghana is not available. PayPal has no official explanation for why Ghana and other countries are being blacklisted but fraudulent activities and the security of our banking systems, among others, are suspicious factors of this restriction. Fortunately, there is a way to create an account and use PayPal as a Ghanaian for your financial transactions. How can you do that? Is it a legal way? Find answers in the next section.
Which countries use PayPal in Africa?
48 African countries are allowed to legally operate PayPal services including Kenya, Nigeria, South Africa, Egypt and Lesotho. If you are interested, find all countries here. Some countries listed there have partial restrictions. For instance, PayPal restricts Nigeria to only personal accounts and even with that users can only send money and make payments online without receiving.
To use PayPal, you are required to create either a Personal account or a Business account. It’s self-explanatory, right? A personal account is owned by an individual for all financial purposes while a Business account is more of an account representing your Business financial activities. Let’s dive into how you can create one for yourself!
Creating a PayPal account in Ghana
How to create a PayPal account in Ghana
Here’s a step-by-step guide to creating a PayPal account as a Ghanaian user:
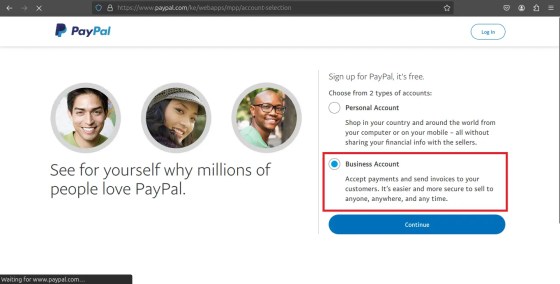
Step 1: Go to PayPal.com/ke
Step 2: Hit the sign-up button

Step 3: Select Business account

Step 4: A form page will appear for you to fill out. Enter your first name, last name, email address(not used in PayPal before) and a strong password. Check the user agreement and hit Agree and Create Account.

Step 5: Confirm your email address here. Tap Email you a code, check your email and copy and paste.

Step 6: At this stage, your account is created but you need to activate it before you can start using it. To activate, click Let’s Go.
Step 7: Build your profile from this page. Select Individual Seller / Sole Proprietor and click next.
Step 8: Fill the form above. For the nationality field, you can change it to Ghana or ignore it.
Use the residential address I used as your residential address.


Step 9: PayPal needs more information about your Business so kindly provide them in the new form.
Note: Your Business ID can be your national ID.
Step 10: Your account is now activated Congrats! Go to your dashboard to confirm the information you provided.
Confirm the Information of your PayPal account
Do you remember I mentioned supporting documents as a requirement for creating this account? It’s what will serve as evidence of your identity. On your dashboard, under notifications, PayPal notifies you to confirm your account details as they find suspicious activities on your account. Do not worry it’s a simple process. Make sure you’ve scanned your document ID to get the digital version you will be uploading. Learn to scan your documents.
Here’s how you can confirm the details of your account:
Step 1: Tap See Details and click Resolve on the next page.

Step 2: Select the document type and upload it.
After PayPal completes their checks, they will send you an email labelled “Your account has been restored“. This means your account is accepted and can now enjoy the full services of PayPal. Congratulations!
How do I delete my PayPal account permanently?
Here’s how you can delete your PayPal account:
Step 1: On your dashboard, hover on your profile at the top-right.
Step 2: Select Account settings from the options.
Step 3: Under the Account preferences tab, click Close Account near Account type.


